C2C User Manual
Complete guide for managing USDC disbursements, project setup, and beneficiary management in Rahat's C2C platform.
📊 Dashboard Overview
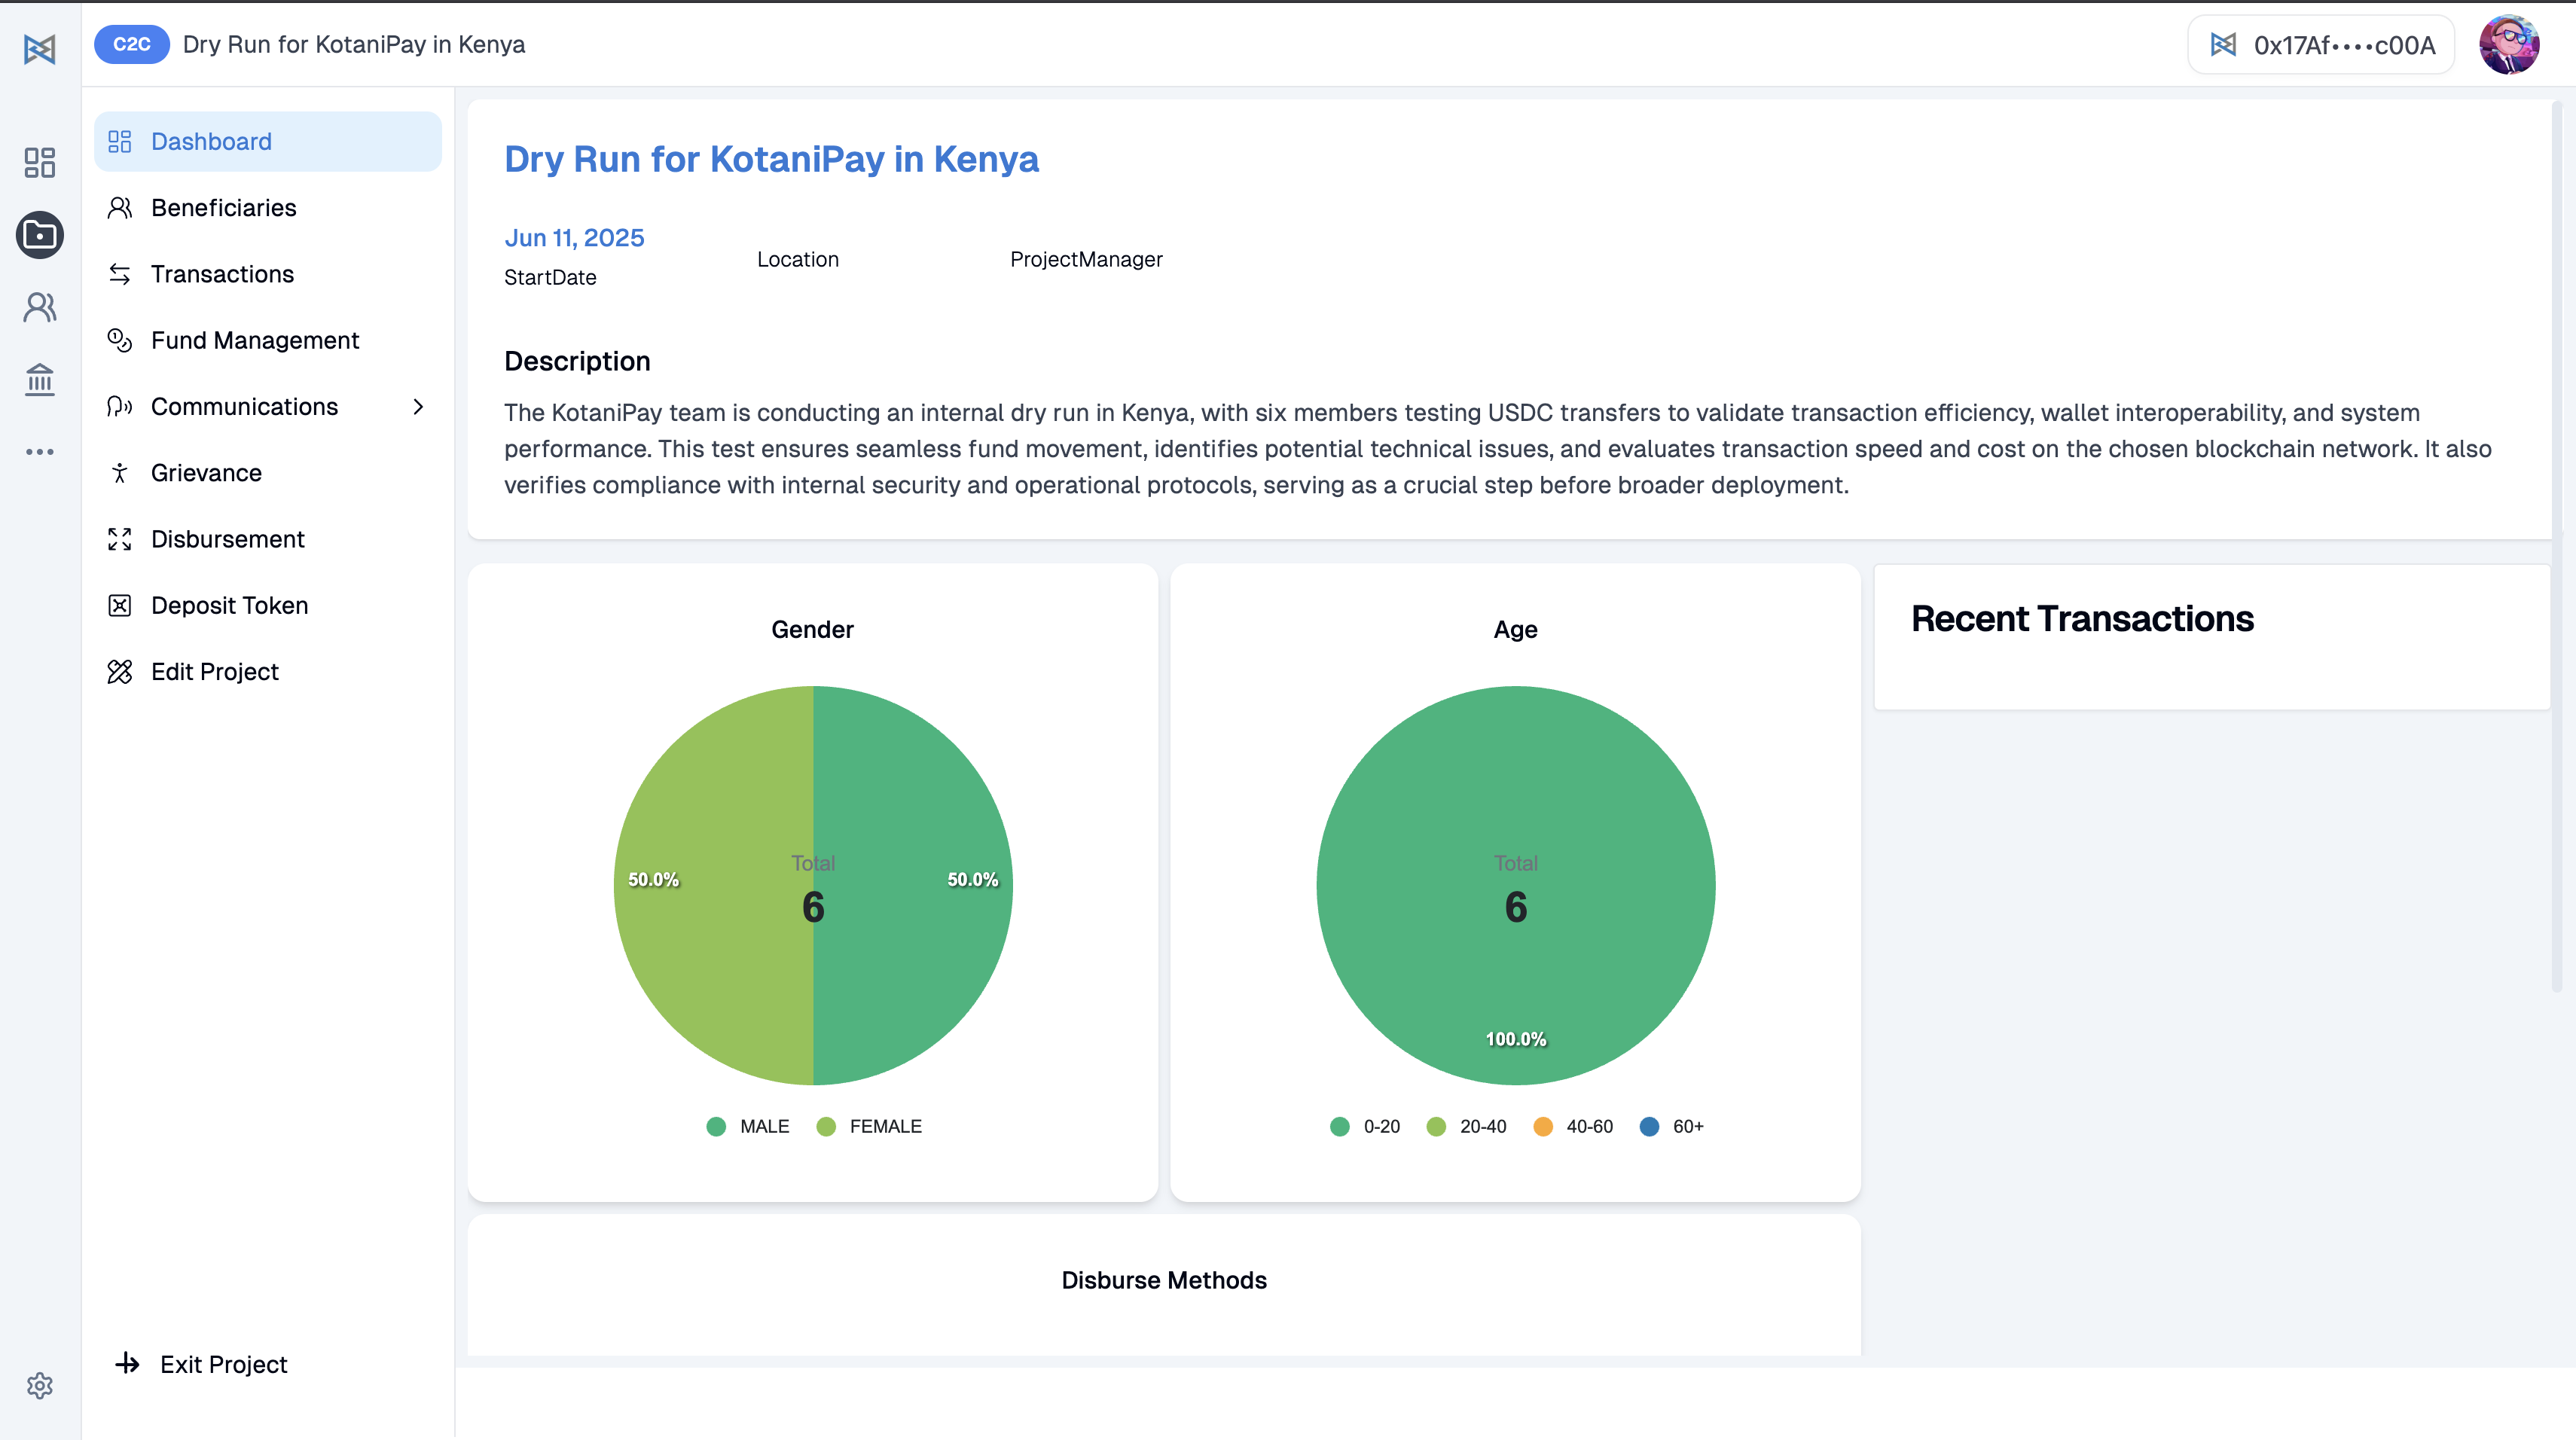
Within each project, the Project Dashboard provides a quick overview of key details and progress.
Left Navigation Menu
The dashboard provides access to the following sections:
- 📊 Dashboard - Project overview and statistics
- 👥 Beneficiaries - Manage beneficiary information
- ↗️ Transactions - View transaction history
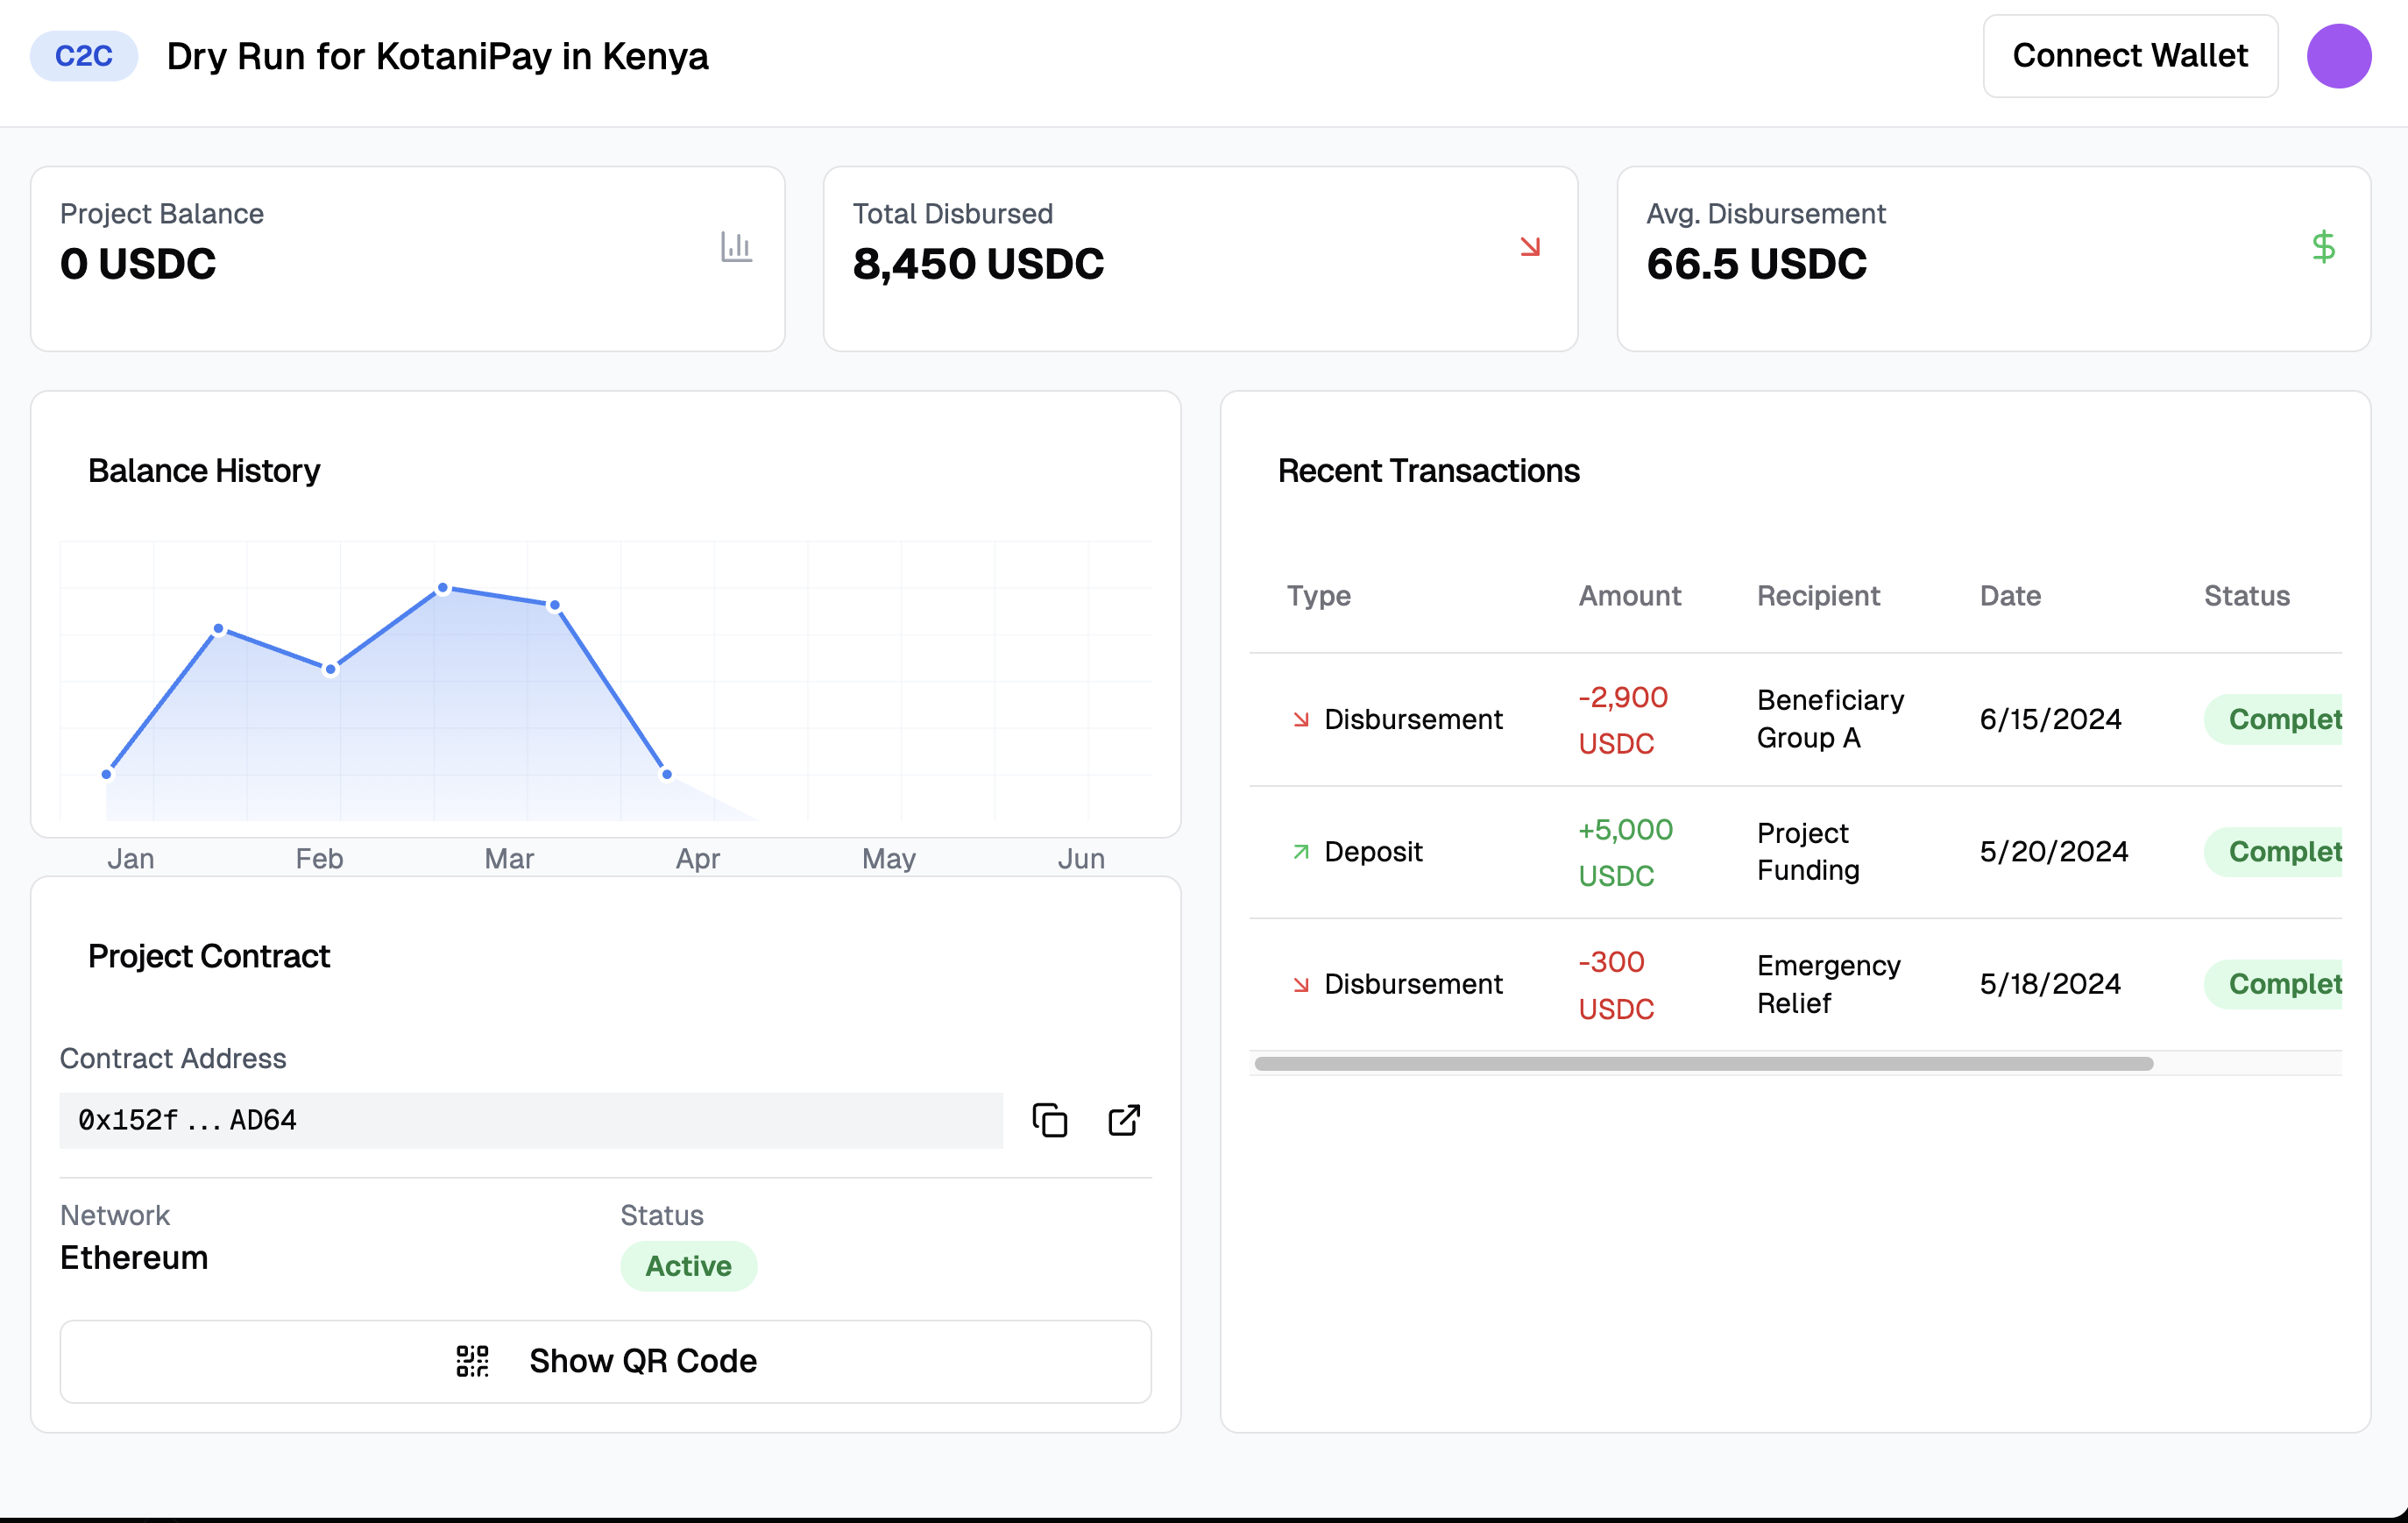
- 💰 Fund Management - Manage project funds
- 💬 Communications - Communicate with beneficiaries
- 📄 Grievance - Handle complaints and issues
- 📤 Disbursement - Send funds to beneficiaries
- 💳 Deposit Token - Add tokens to the project
- ⚙️ Edit Project - Modify project settings
Dashboard Features
- Project information overview
- Gender and age distribution charts
- Recent transactions display
- Disbursement methods summary
- Real-time project statistics
- Quick action buttons
These sections help manage beneficiaries, funds, communications, and token disbursements efficiently from a centralized dashboard.
🏗️ Project Setup
Before you can begin sending USDC (crypto aid) to your beneficiaries, the project needs to be properly configured. This involves selecting the blockchain network and setting up your treasury.
Step 1: 🔶 Choose the Blockchain Network
Each project must run on a blockchain. Rahat supports EVM-based networks such as:
Supported Networks
| Network | Type | Description |
|---|---|---|
| Ethereum | Main network | Primary blockchain network |
| Polygon | Layer 2 solution | Faster and cheaper transactions |
| Celo | Mobile-first | Optimized for mobile usage |
This defines where your smart contracts live and where funds will be sent from.
Step 2: 🔐 Set Up Gnosis Safe Wallet (If Using Multisig)
If your project uses multi-signature approval for fund disbursement (highly recommended for accountability), you will need a Gnosis Safe wallet.
Multi-Signature Benefits
- ✅ Enhanced security through multiple approvals
- ✅ Transparent decision-making process
- ✅ Reduced risk of unauthorized transactions
- ✅ Audit trail for all disbursements
Example Use Case
A Gnosis Safe wallet requires multiple people (signers) to approve each transaction before funds are sent. For example: 2 out of 3 people must approve before the system sends USDC.
This setup is done from the backend by the technical team. Click here to see how to configure Gnosis Safe wallet
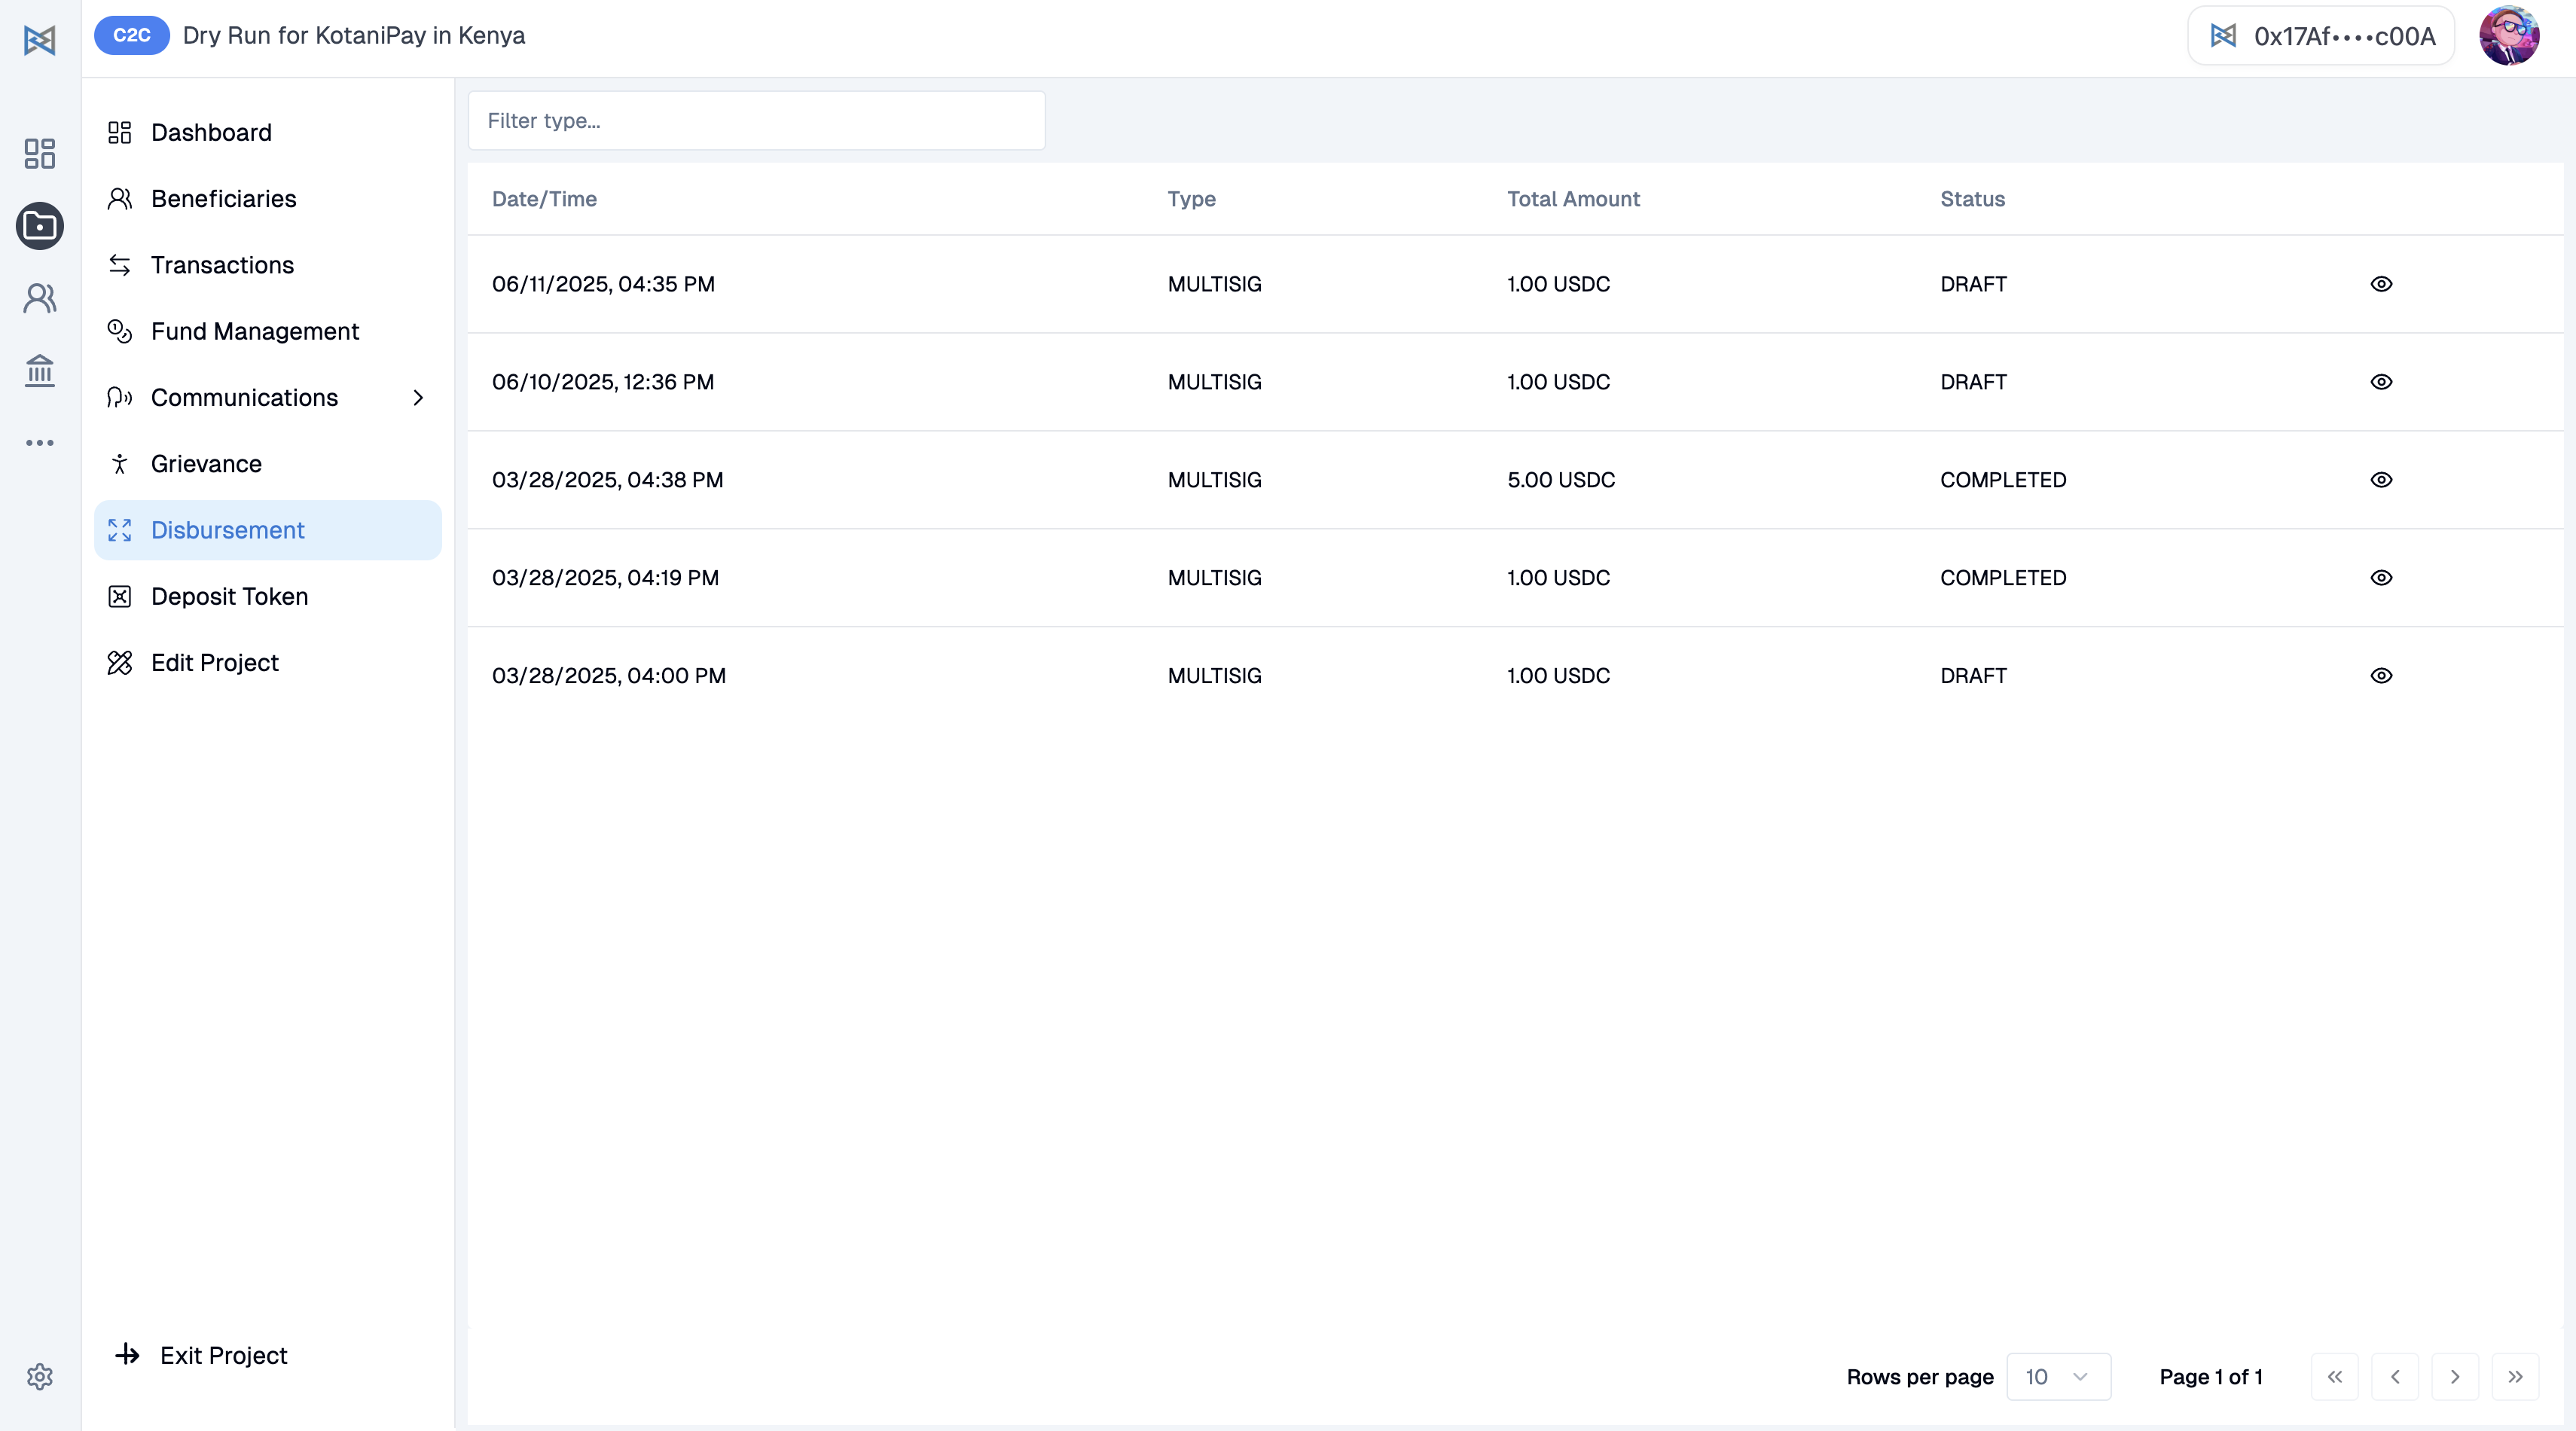
💸 Disbursing USDC to Beneficiaries
Once your project is set up and beneficiaries are ready, you can start disbursing aid.
✅ Pre-Disbursement Checklist
Make sure:
- ✅ All intended beneficiaries are imported into the system
- ✅ If disbursing in bulk, beneficiaries are grouped properly (e.g., by location or batch)
- ✅ Project setup is complete, including treasury source configuration
- ✅ Wallet addresses are verified and validated
🎯 How to Disburse USDC
🔹 For Individual Disbursement
- Navigate to Beneficiaries - Go to the Beneficiaries section from the sidebar
- Select Beneficiary - Select the specific beneficiary you want to send funds to
- Click Disburse - Initiate the disbursement process
🔹 Treasury Source Options
You will see 3 Treasury Source Options. Each option is a way to send money. Choose one based on where the funds are coming from:
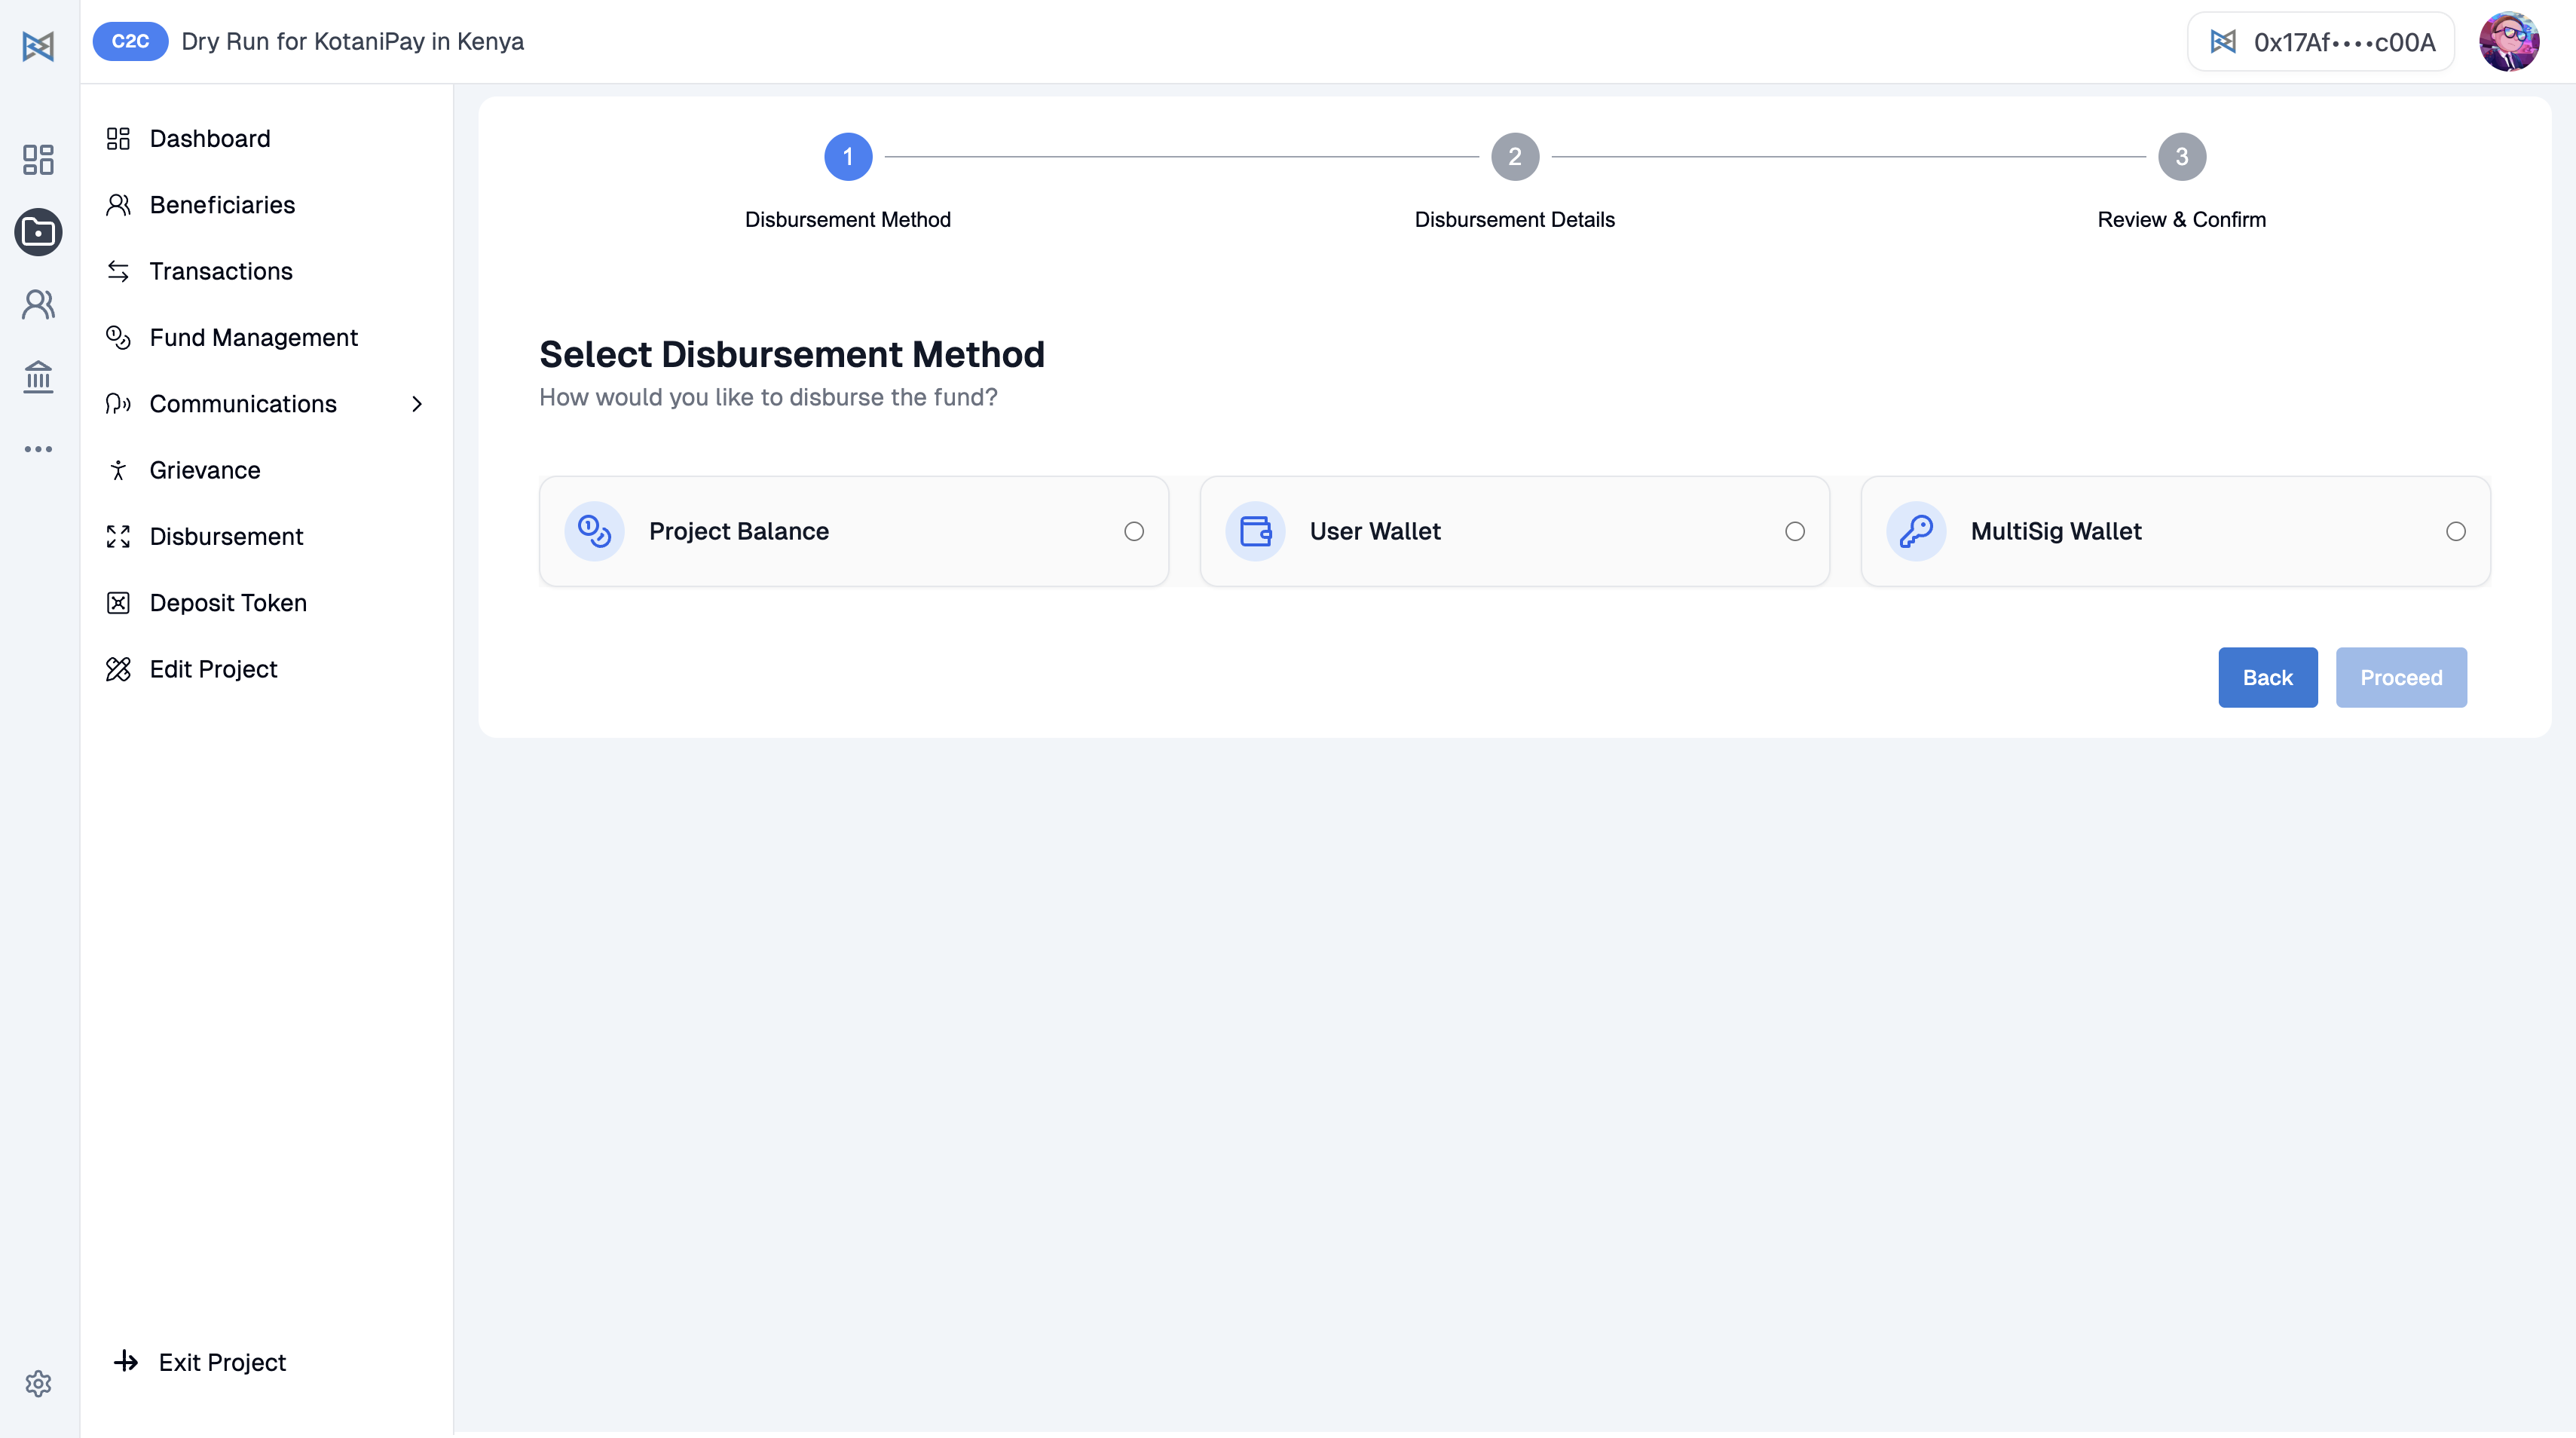
1. Project Balance
- Funds are held in a project-specific smart contract
- This contract must already be funded with USDC
- USDC is sent directly to the beneficiary from the smart contract
📎See how to fund your project contract
2. User Wallet
- Sends USDC directly from your connected wallet (like MetaMask)
- You must have USDC in your wallet
- You will be asked to connect your wallet before proceeding
3. Multisig Wallet (Gnosis Safe) - Recommended
- Ideal for teams that want extra security and transparency
- Disbursement must be approved by multiple people before it goes through
- Funds are stored in a Gnosis Safe
📎 See full guide on multisig disbursement
Disbursement via Project Balance – Detailed Steps
To disburse funds using the Project Balance, follow these steps:
1. Load Balance into Project Contract
First, you must load the balance into the project contract.
Go to Fund Management section
-
Option 1: Copy the Project Contract Wallet Address from the dashboard and paste it into your wallet.
-
Option 2: Scan the QR code by clicking the QR code sign.
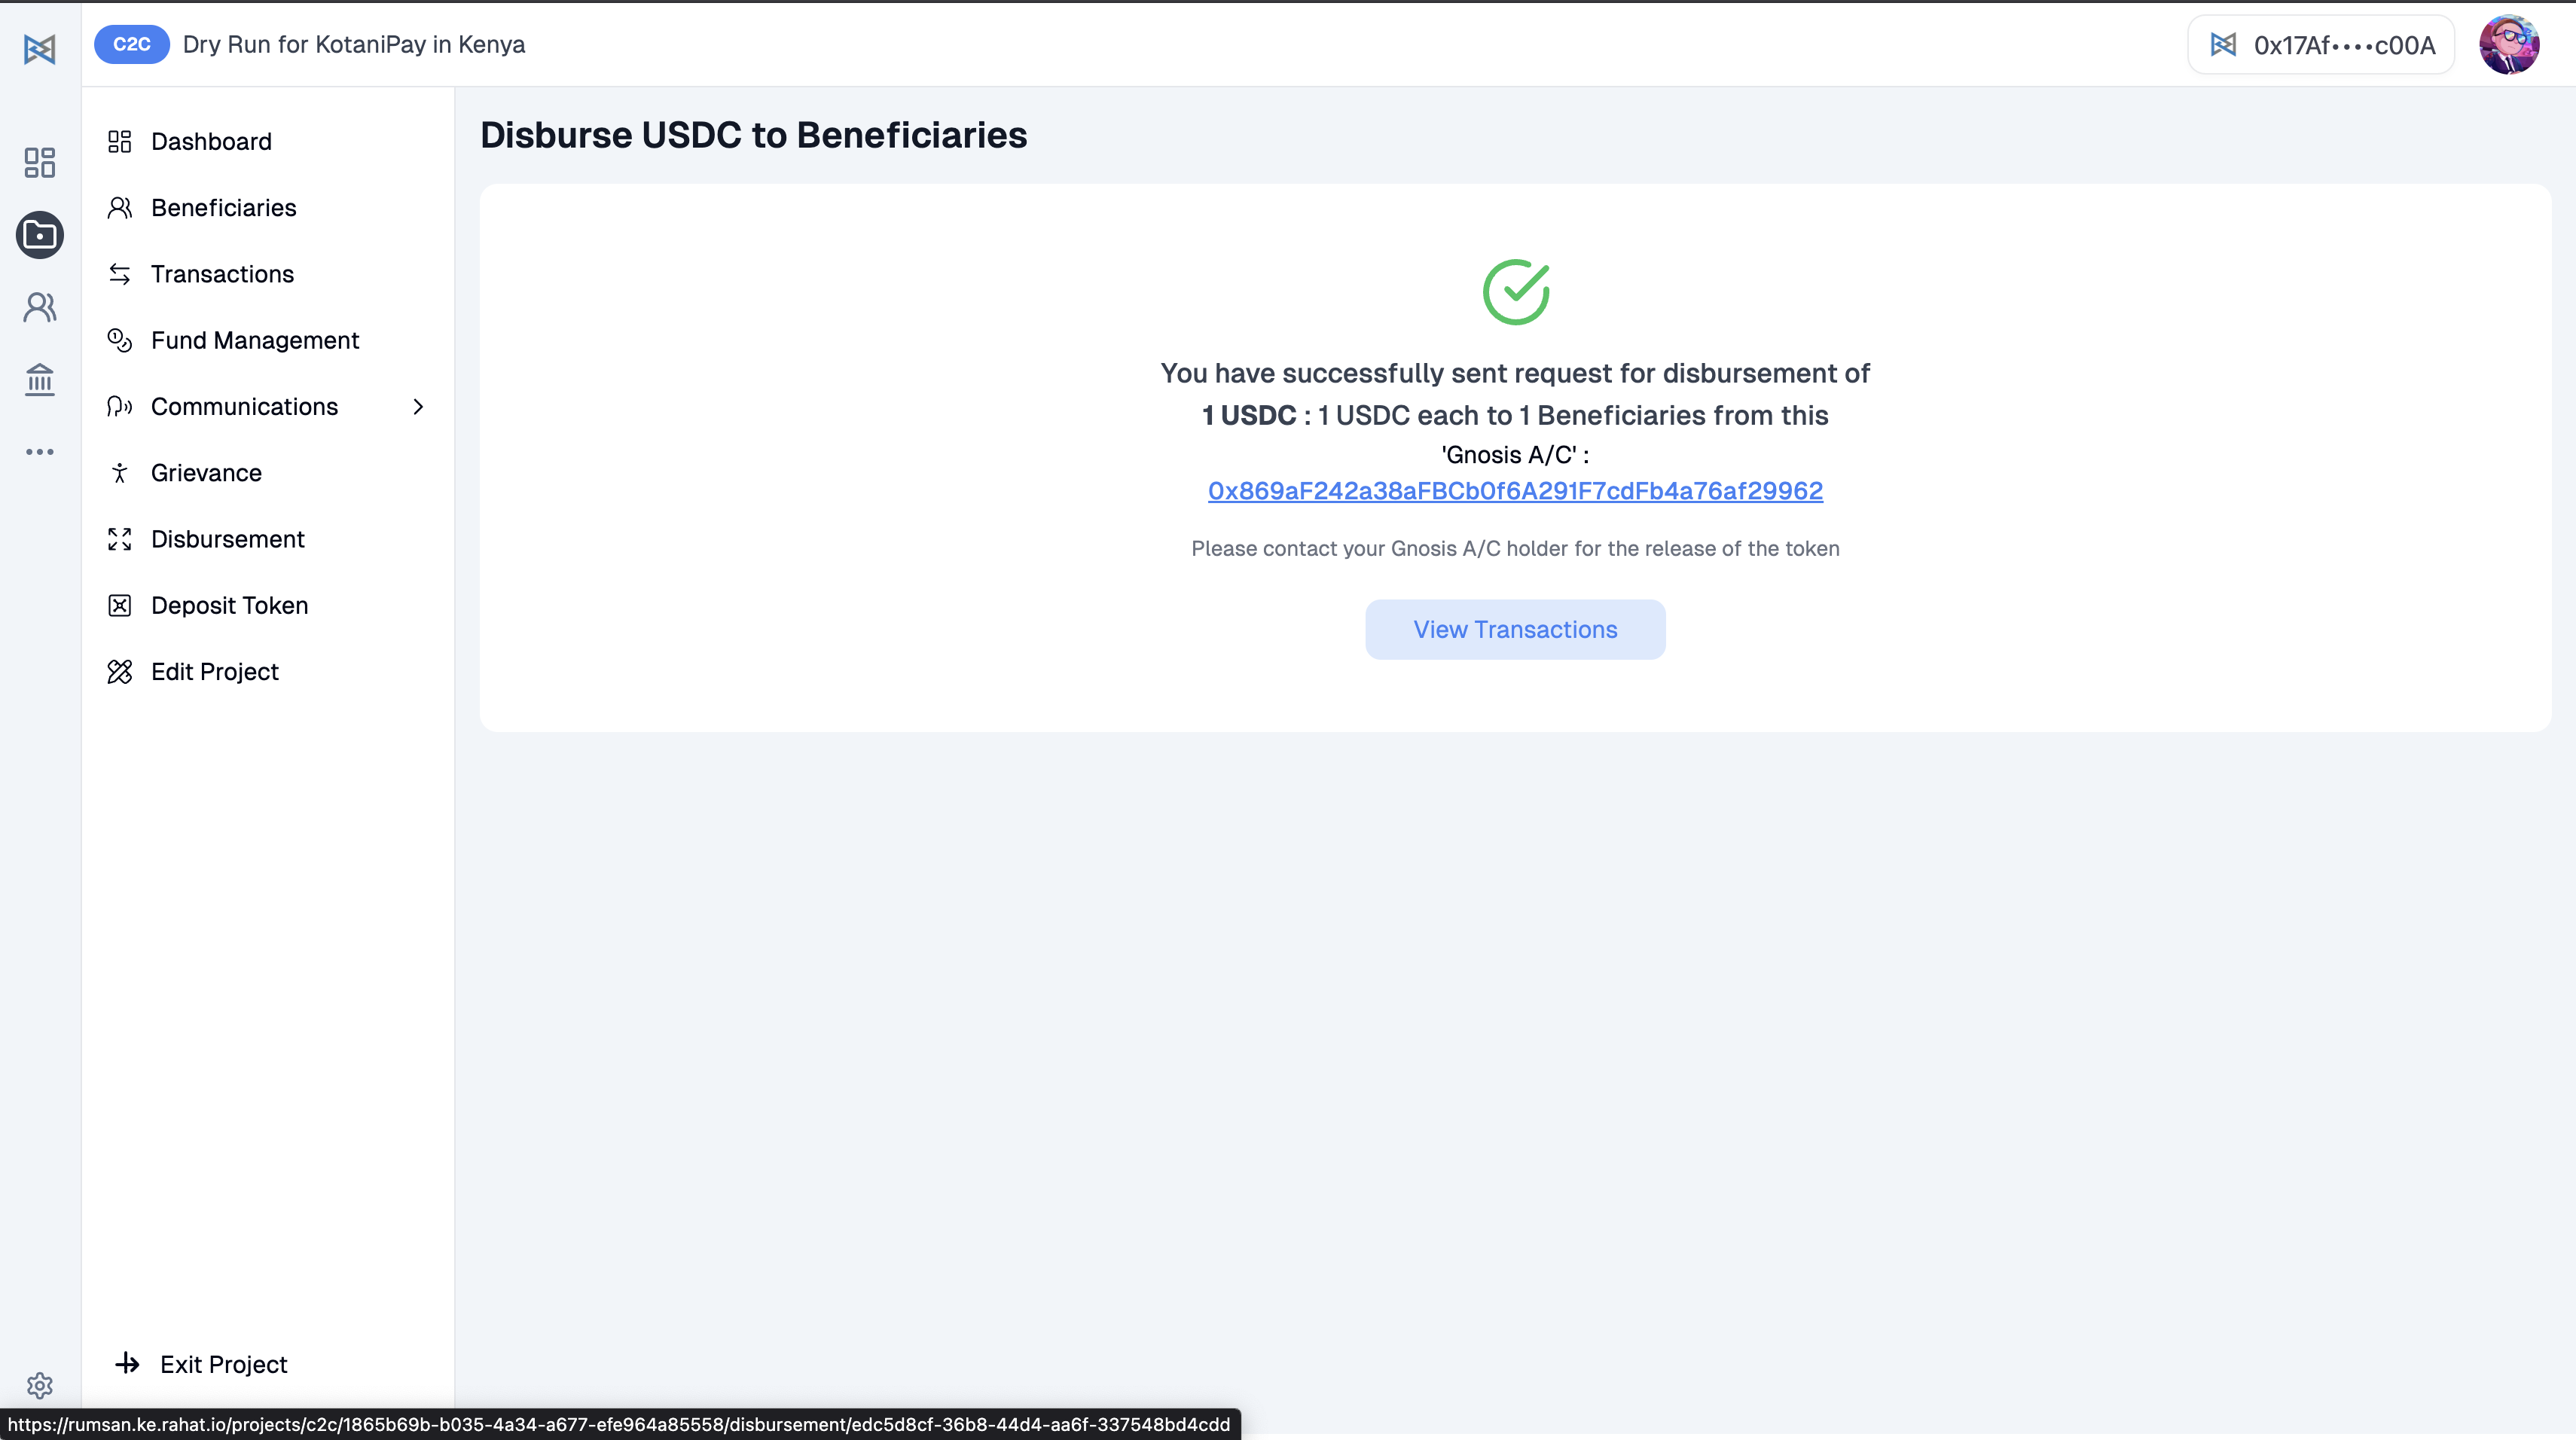
2. Initiate Disbursement
- Select Project Balance as your treasury source.
- Enter the amount to disburse.
- Complete the disbursement.
Disbursement via Multisig – Detailed Steps
After selecting Multisig Wallet as your treasury source, follow these detailed steps:
Step-by-Step Process
Step 1: Input Amount
Input the amount of USDC you want to send per beneficiary.

Step 2: Transaction Request
The platform will create a transaction request and send it to the Gnosis Safe dashboard.
Step 3: Signer Notification
The Gnosis Safe signers will receive a notification in Safe Wallet Dashboard.
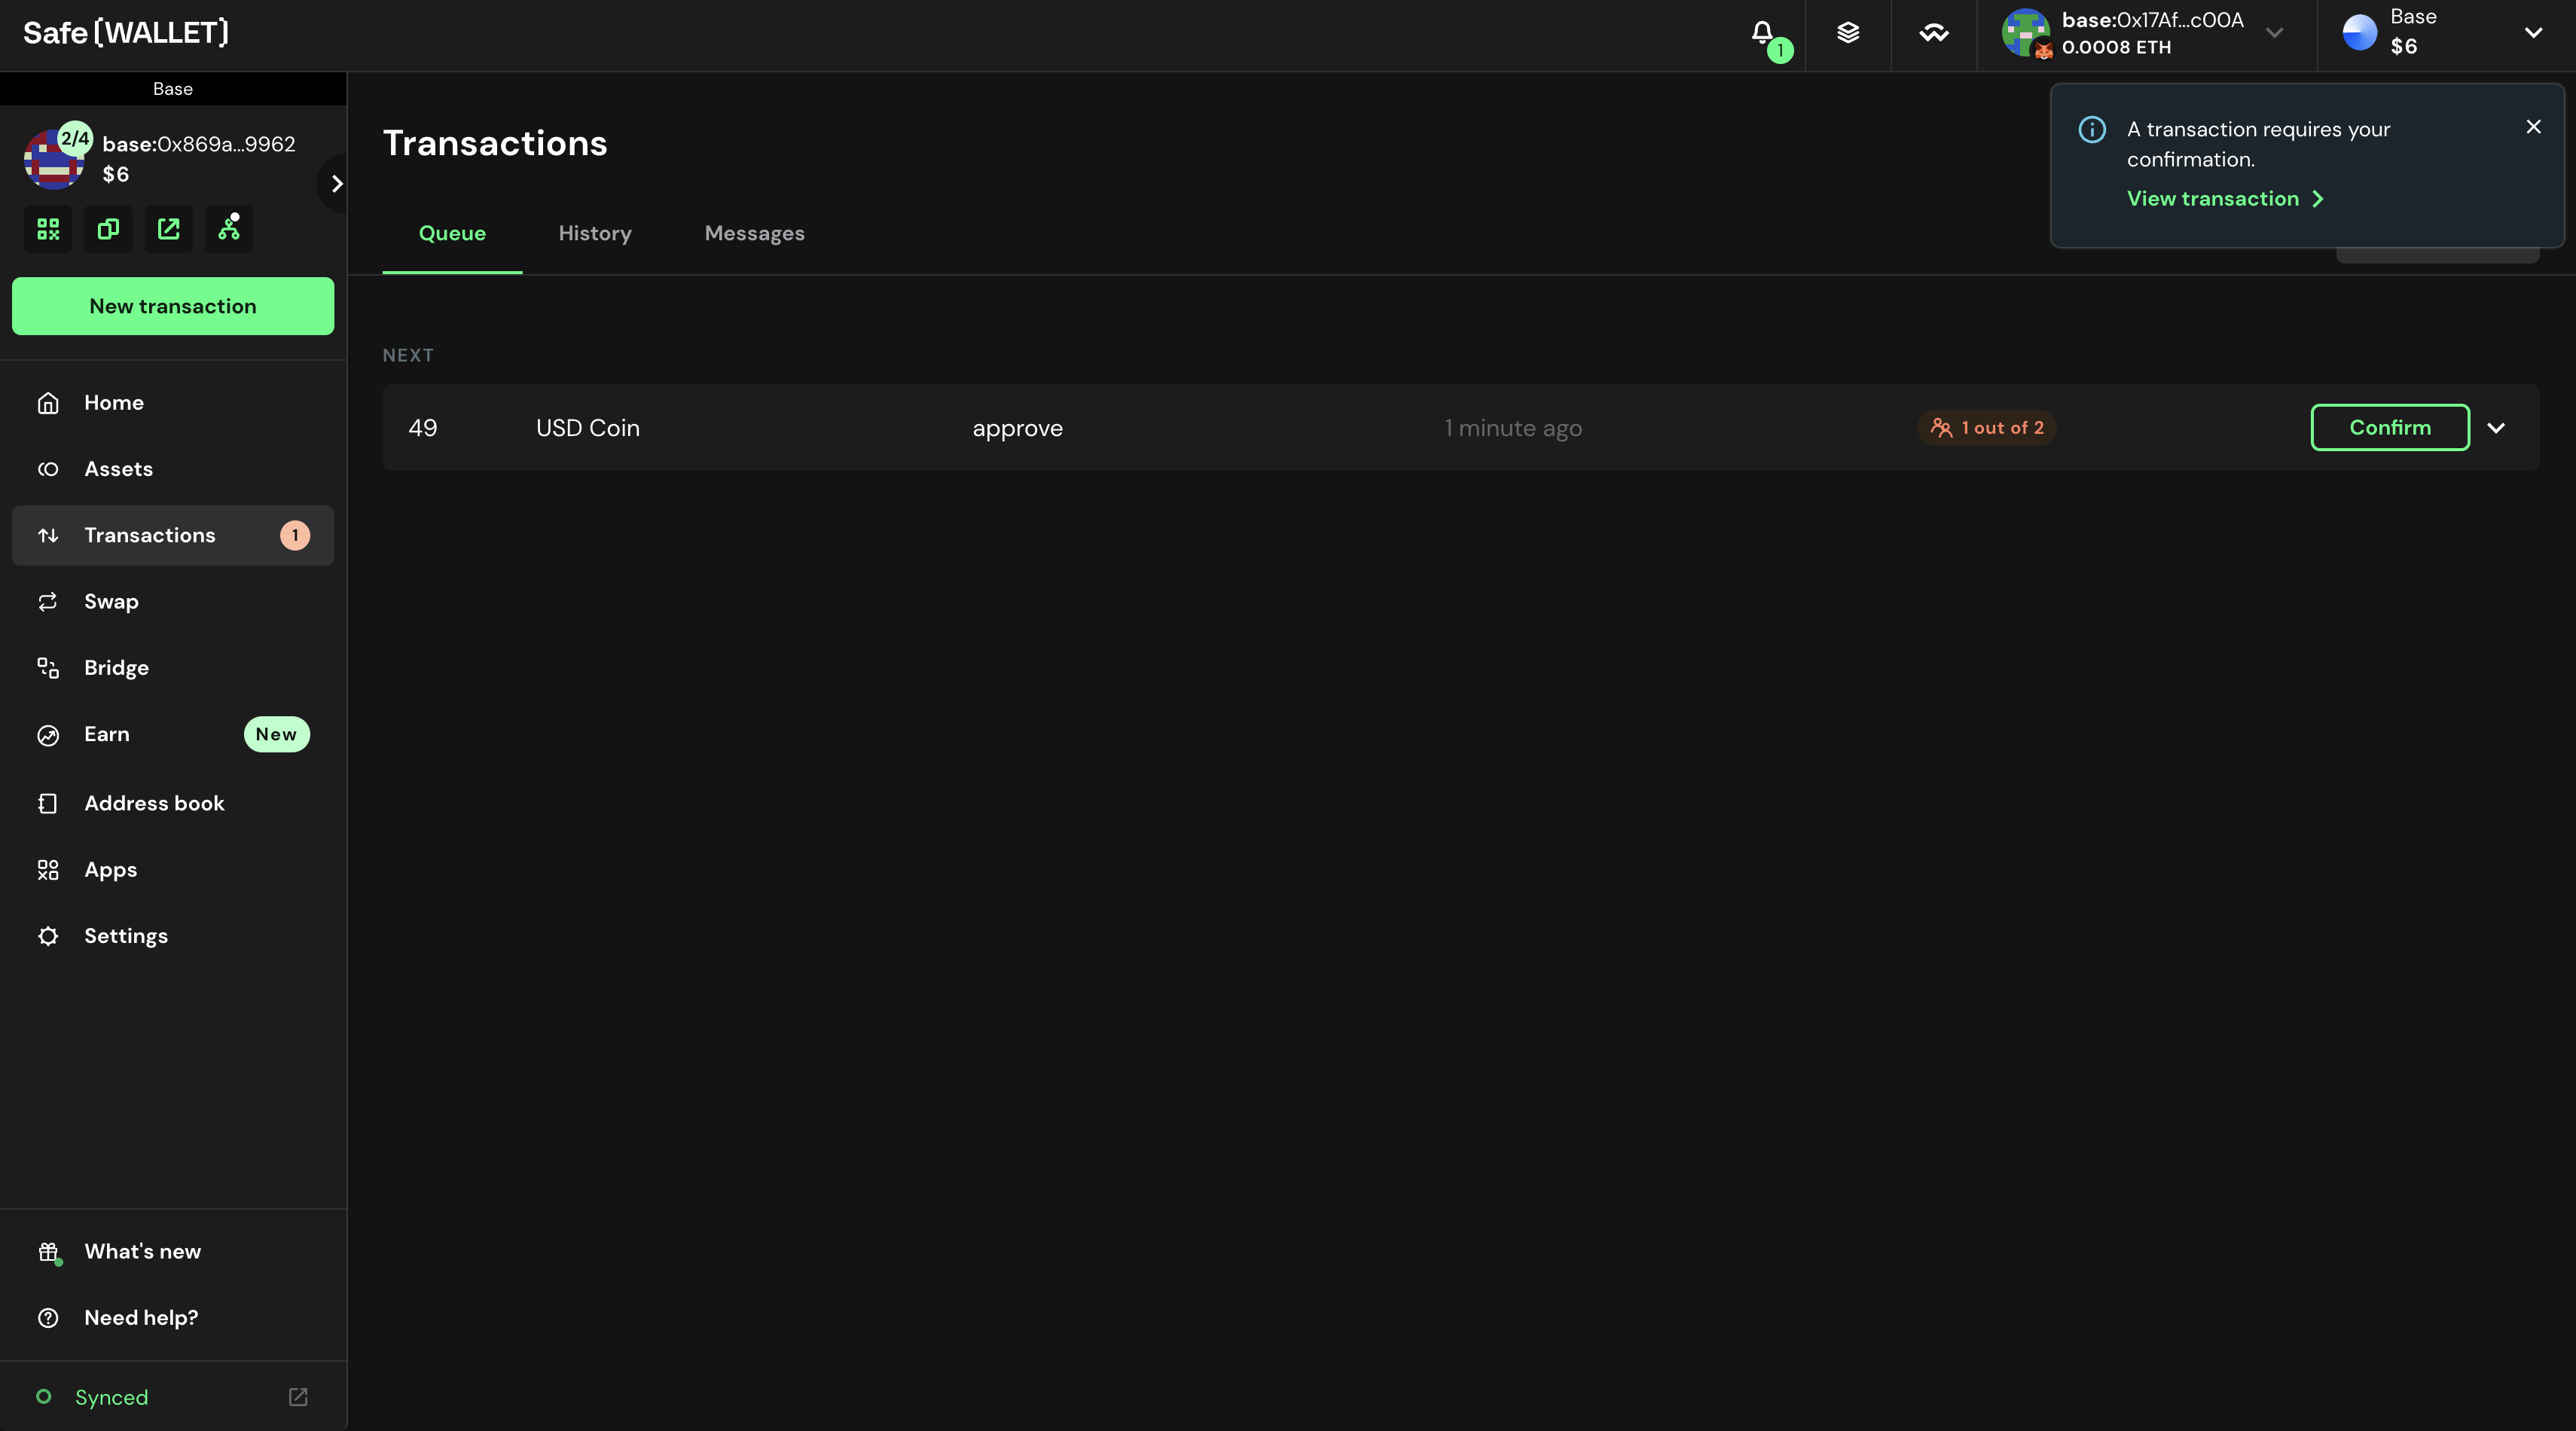
Step 4: Approval Process
Once the required number of signers approve it (e.g., 2 out of 4), the transaction becomes ready.
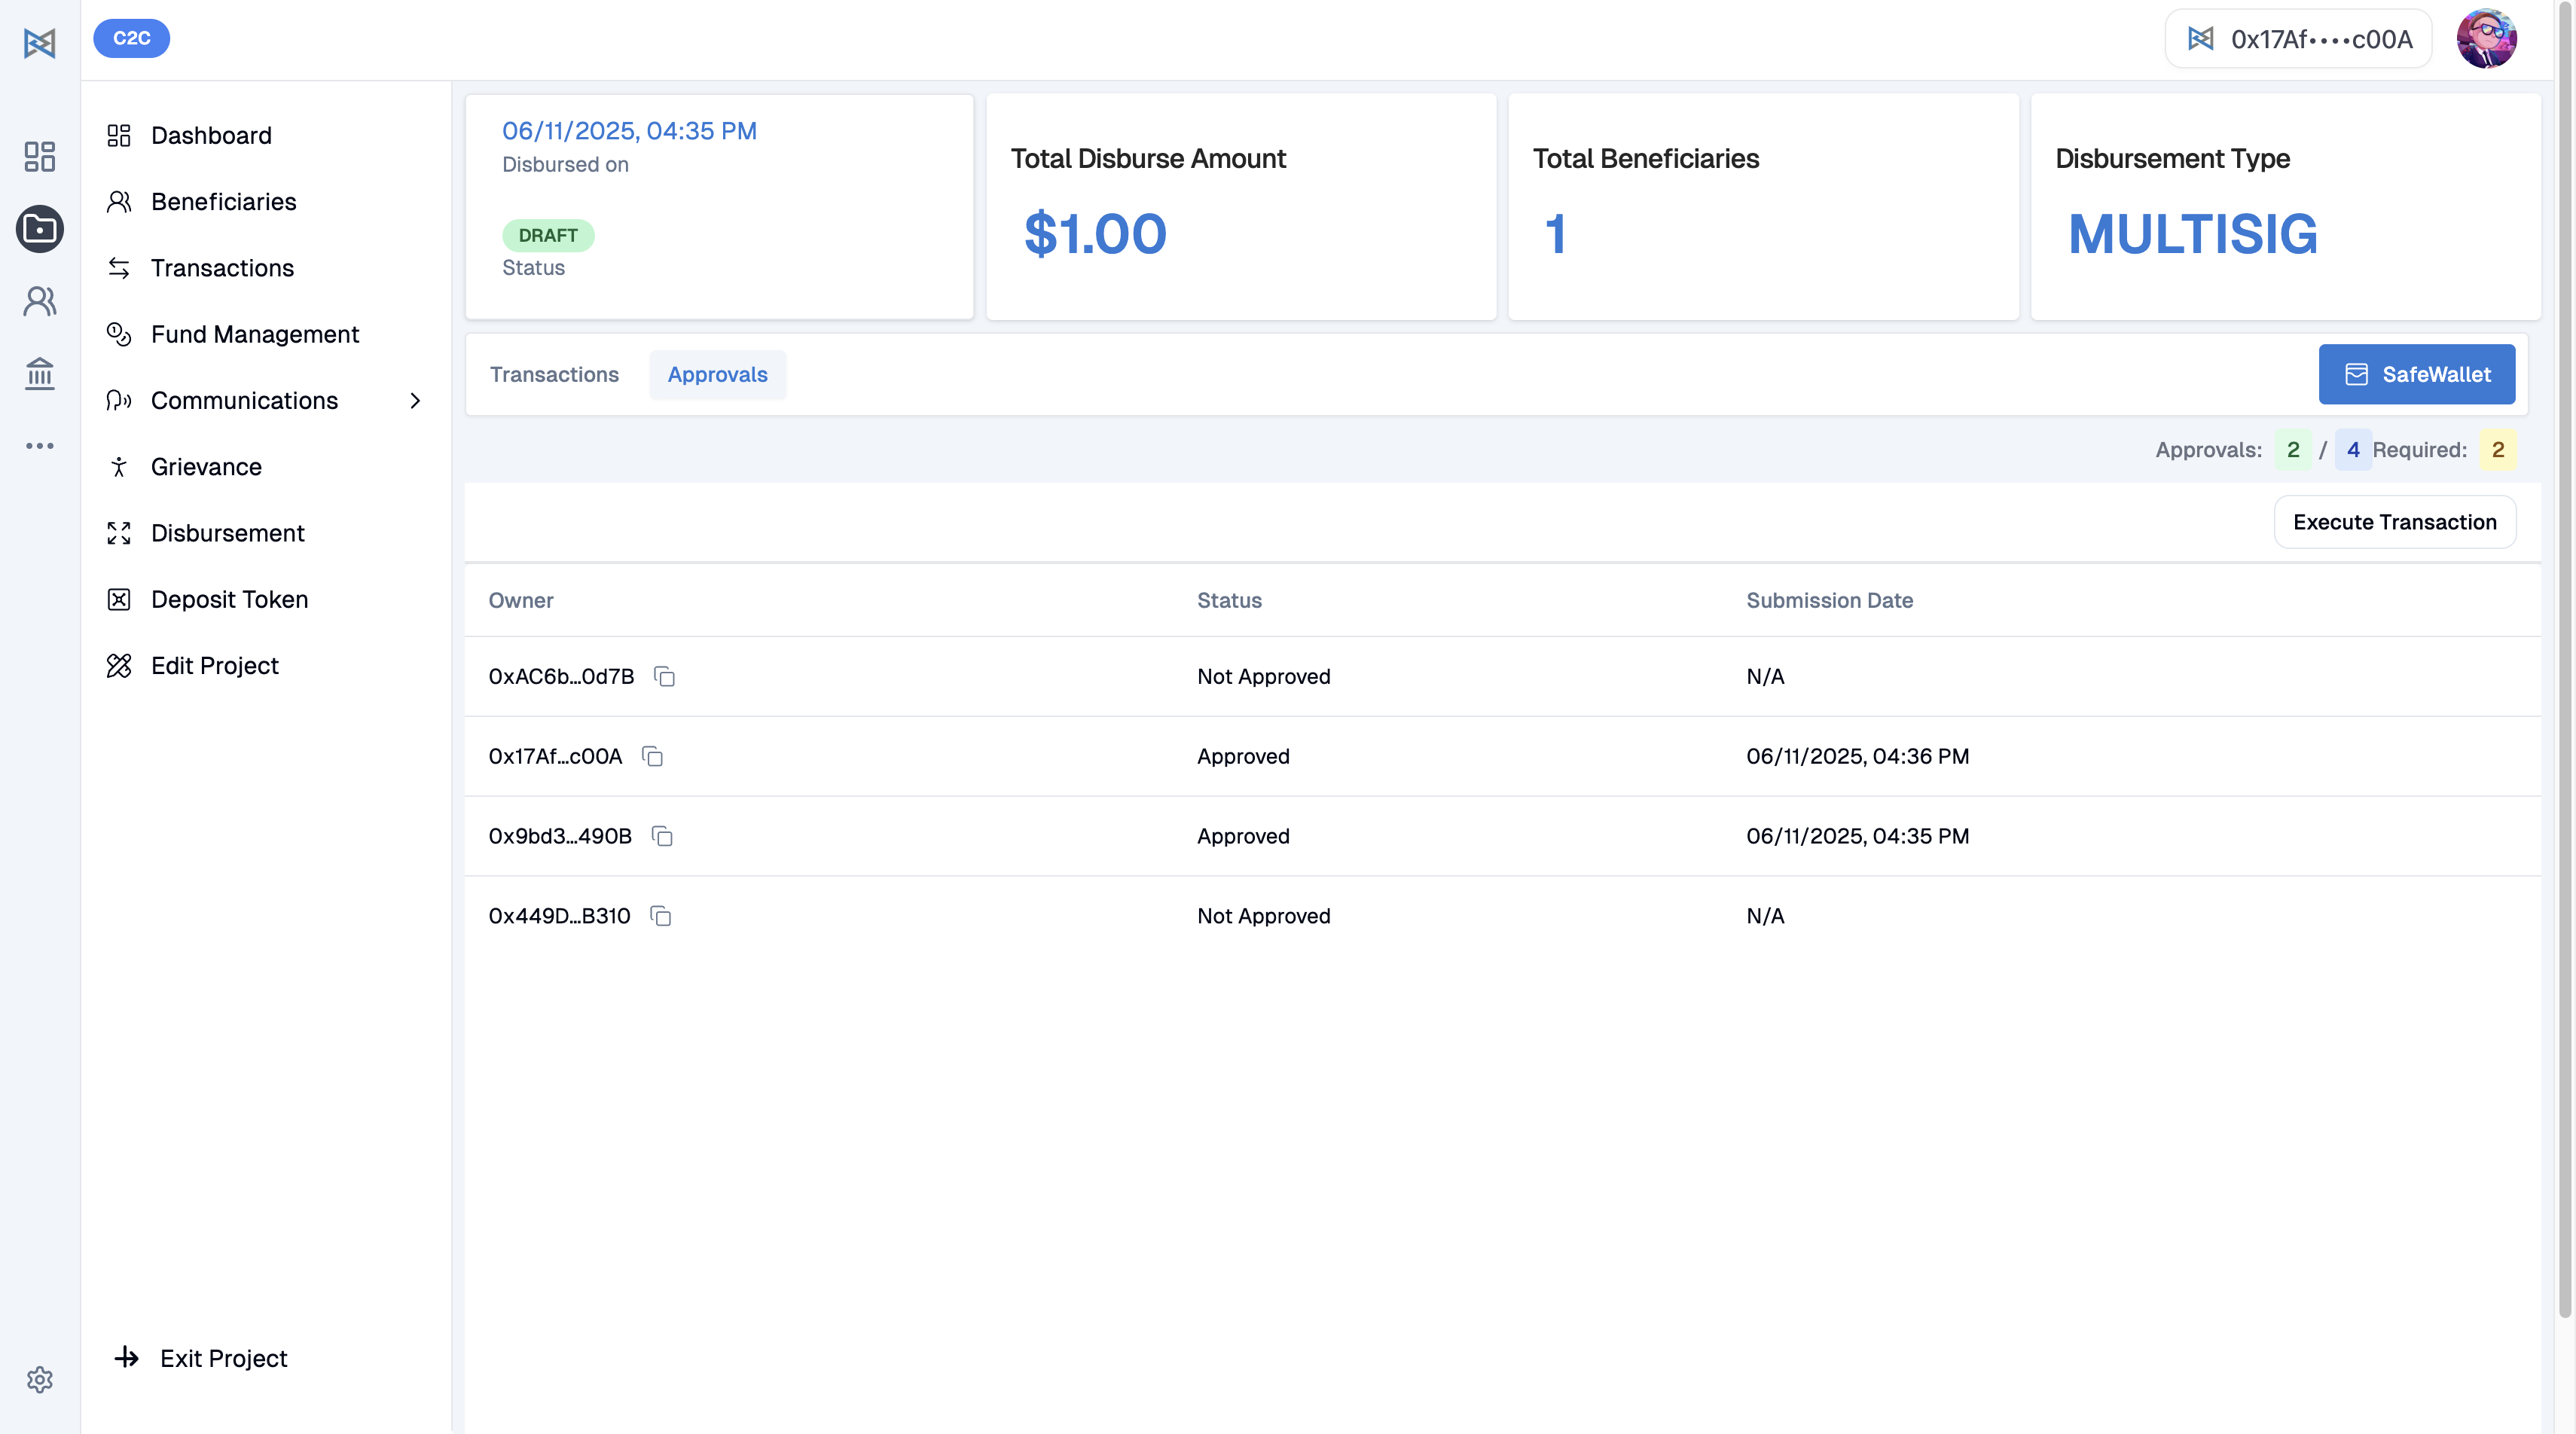
Step 5: Execute Transaction
Execute the Transaction:
-
Go to Disbursement section → Click on the transaction details
-
Click the Execute button
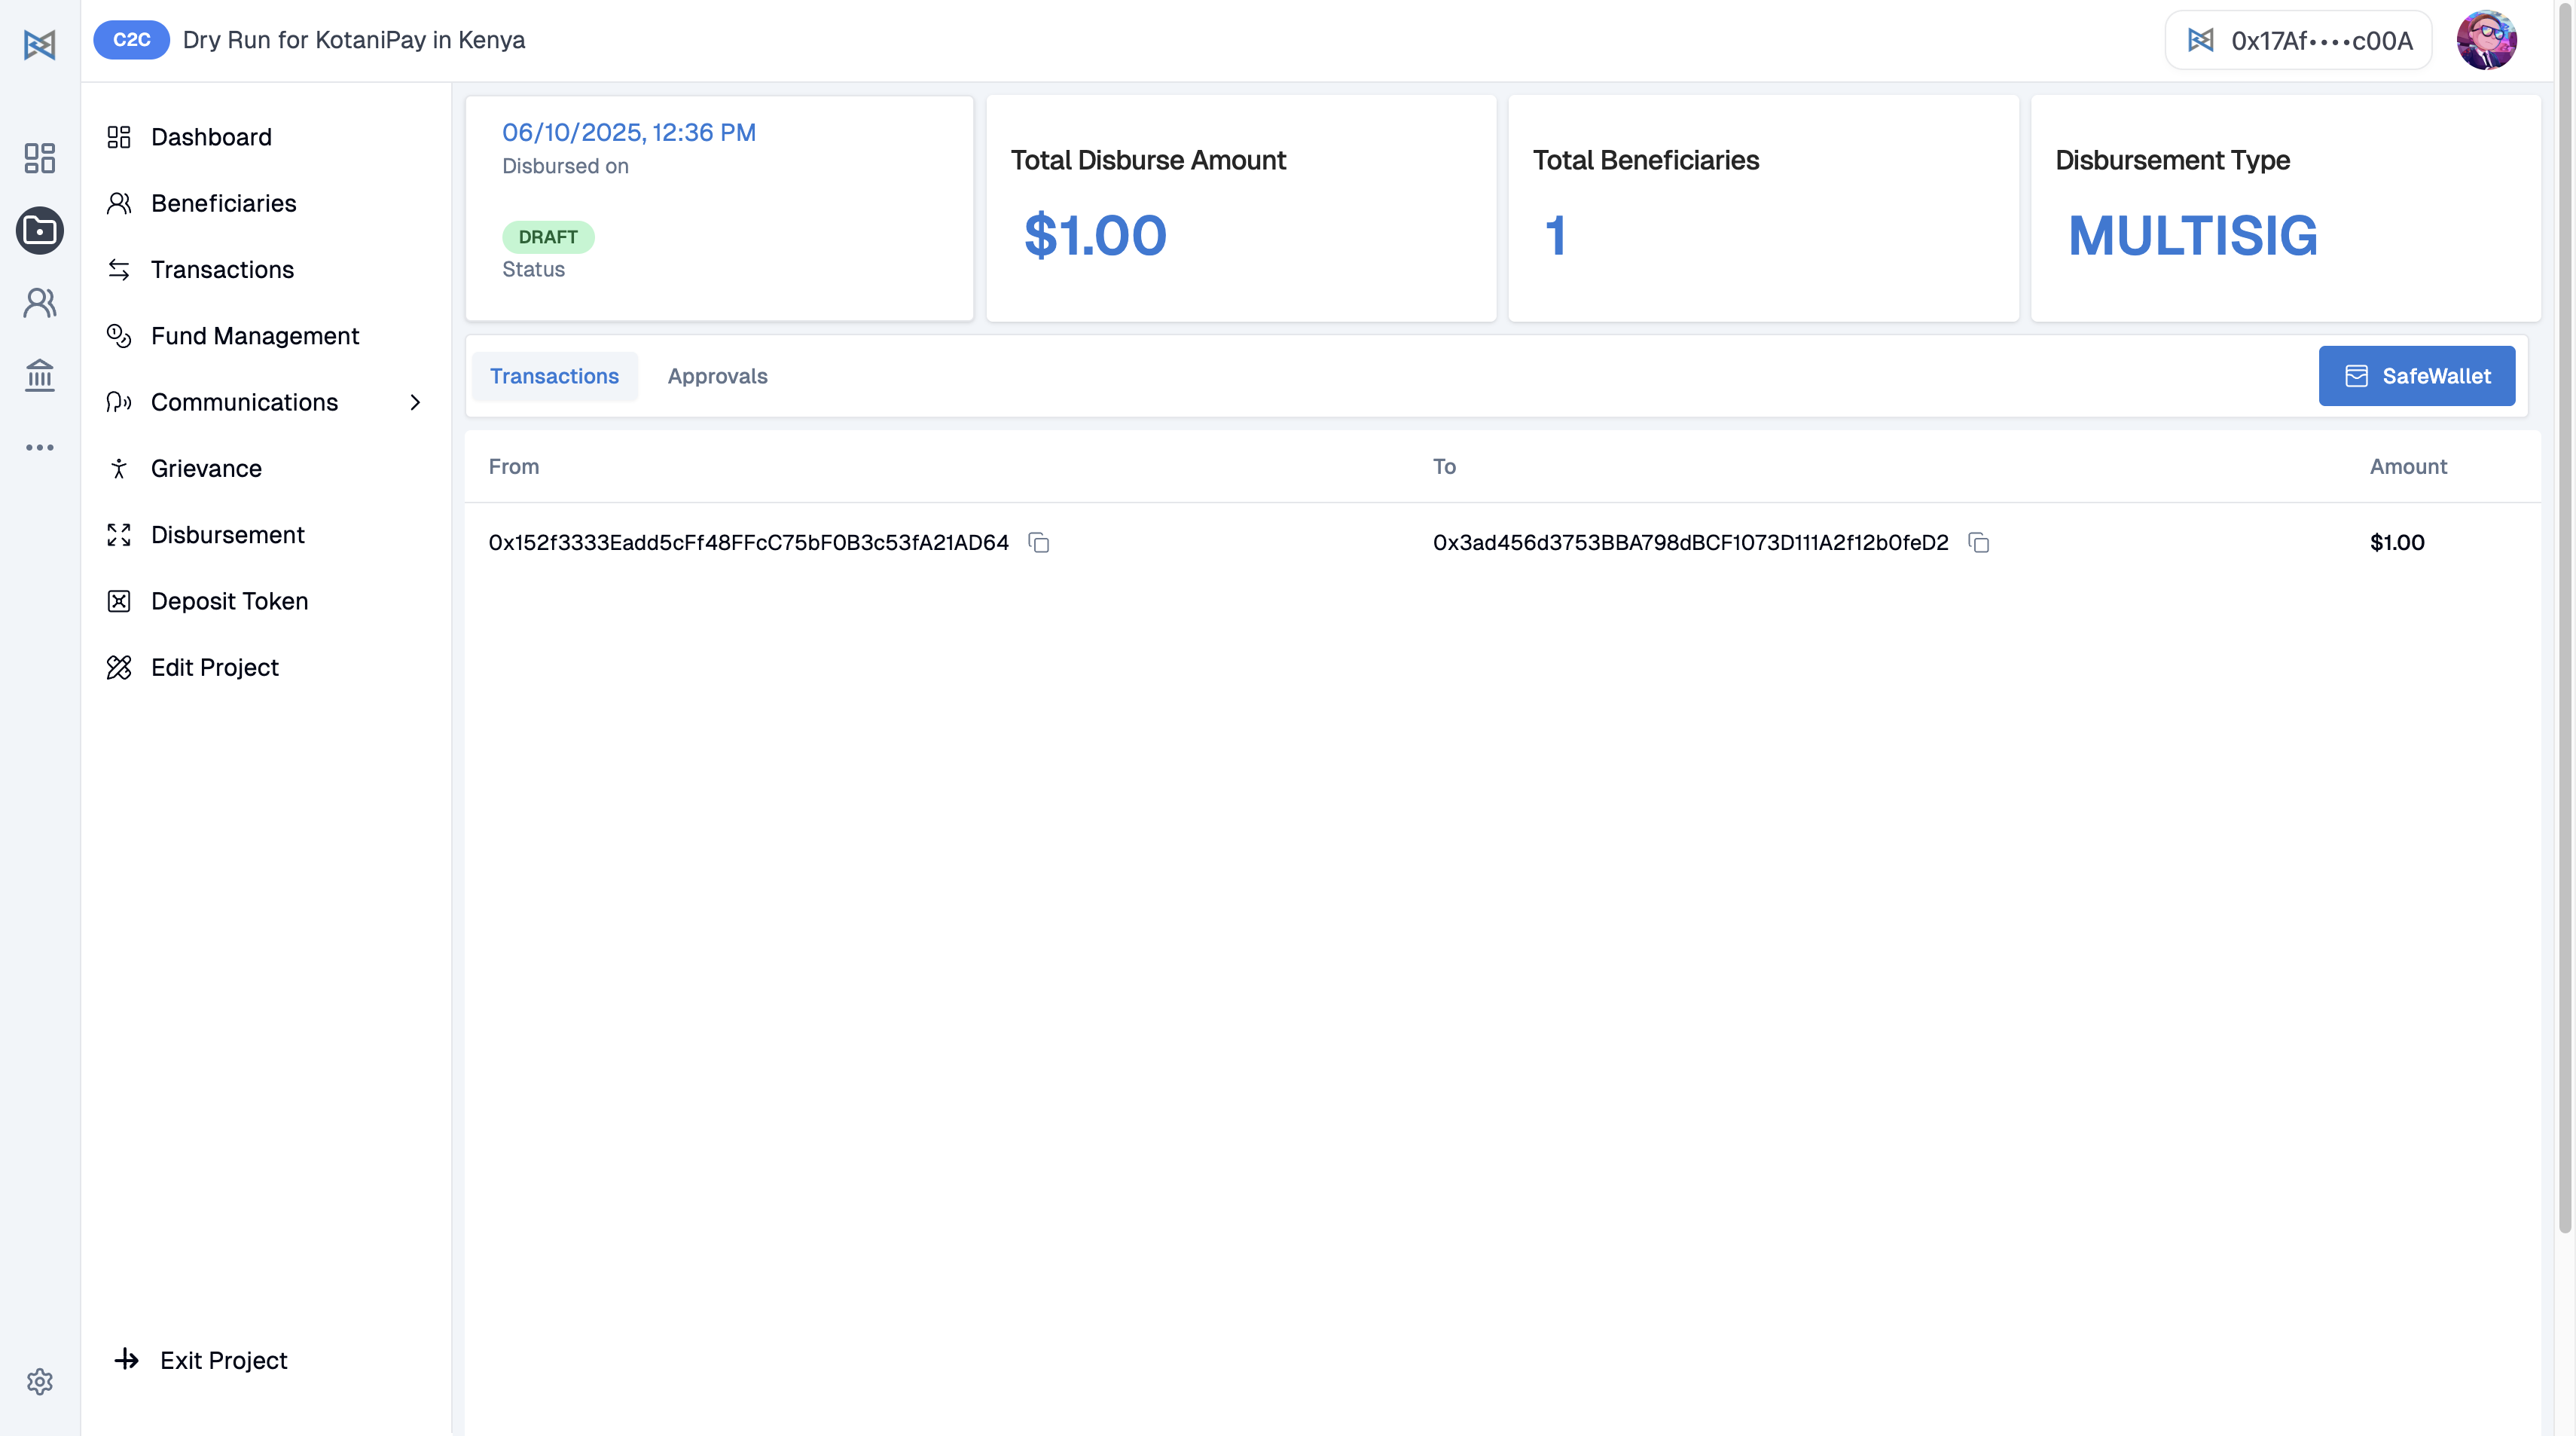
✅ The system will now automatically send the USDC to each beneficiary's wallet.
Step 6: Beneficiary Notification
Beneficiary will receive a message on their mobile number about the disbursement and how to use the money.
The link will be different for every project.
🔄 Offramping via Rahat Offramping Service
If a beneficiary wishes to convert their received USDC into mobile money, they can use the Rahat Offramping Service.
📩 How to Start Offramping
Beneficiaries will receive an email or SMS with a link to start the offramping process.
Sample Message:
"Hello! You have received USDC in your Rahat wallet. To convert it to mobile money, click here: [LINK]. For support, contact us at support@rahat.io"
By clicking on the link, beneficiaries are taken to the Rahat offramping portal.
📘 Learn More
If you want to understand how beneficiaries can offramp USDC, including the steps and flow:
🔗How Offramping Works for Beneficiaries
📊 Tracking Offramping Transactions (for Admins)
All offramping activities done through the Rahat Offramping Service are logged and trackable by the admin team.
How to View Offramping Transactions
Navigation Steps:
- Log in to the Rahat Dashboard
- Go to C2C project Dashboard
- Navigate to the Transactions section
- Click on the Offramping Transaction tab
Available Information:
You will be able to view:
| Field | Description |
|---|---|
| ✅ Beneficiary name | Name of the beneficiary |
| ✅ Amount offramped | Amount converted to mobile money |
| ✅ Fiat Received Chain | Payment method used |
| ✅ Status | Transaction status |
| ✅ Timestamp | Date and time of transaction |
Quick Reference
Key Features
- Multi-signature security with Gnosis Safe
- Multiple blockchain network support
- Real-time transaction tracking
- Automated beneficiary notifications
- Comprehensive reporting system
- Offramping service integration
Support Resources
- Technical team for Gnosis Safe setup
- Project configuration guides
- Beneficiary onboarding documentation
- Transaction troubleshooting
- Offramping process guides
- Admin dashboard tutorials
Need Help?
If you encounter any issues or need additional support, please contact our technical team or refer to the specific guides mentioned throughout this documentation.